Using the New Bread Pan

I finally had a chance to use the new bread pan John got me over the holidays! It’s for French/Italian type loaves, and, at least in my case, it REALLY helps them keep their shape instead of spreading out too much and going too flat during the second rising.

The pan is about a foot and a half long, so the loaves you’re seeing are a bit on the small side (as compared to, say, Italian bread you’d see in the grocery store), but that worked well for us as we ate one and put the other one in the freezer.

This pan is a Chicago Commerical II pan, and it did a GREAT job – loaves were much rounder and ‘normal’ shape and the holes let the underside get baked properly as well – I’d definitely recommend this pan!  🙂

Mini French Bread Loaves

I think I’m getting better at this yeast-bread thing – bodes well for 2013! (Happy New Year!)

I made two mini french bread loaves and they rose and baked perfectly! Sure, I still need to work on ‘form’ but I can’t wait to cut a slice, just for sampling purposes, of course.

Farmhouse White Bread

I tried another recipe from my friend Barbara Mack’s book, Easy, Fabulous Bread Making: A collection of quick, no-knead, homemade bread recipes – just a basic white bread – and it came out just perfect!

Farmhouse White Bread ©Kristen N. Fox, foodfollies.com

I didn’t actually have the patience to let it sit overnight in the refrigerator, as per directions, so I let it rise in a pretty cold kitchen for a while, then punched it down and let it rise in the glass pan and then baked it.

It made the most delicious peanut butter and jelly sandwich I’ve ever had! Absolutely nothing like homemade!

Portuguese Sweet Bread

A little while ago we bought Easy, Fabulous Bread Making: A collection of quick, no-knead, homemade bread recipes by Barbara Mack (who is an online friend and independent author. And the book is now also available in a Kindle Version) and have been practicing our art of bread making as we get a chance. These are all no-knead recipes in the book; the first rise is done entirely in the refrigerator and you leave the dough in there anywhere from 8 hours to 5 days, so plan ahead and don’t get impatient! (My biggest ‘folly’ with bread making – LOL. But let me tell you that at least 8 hours of slow ‘refrigerator’ rising gives a GREAT flavor!)

Yesterday morning I made her dough for Portuguese Sweet Bread. At about 5 p.m. I took it out of the fridge, formed it into a boule (round loaf) on an oiled baking sheet as recommended. After about 3 hours it finally started to do more than ‘unchill’ itself and started to seem more like bread dough again. But then I broke from the directions and put it in a glass bowl I could also bake it in so it retained it’s shape and more depth, as it seemed like it was spreading out more than rising. It turned out to be a good move – the final bread came out nice and round and golden brown:

As it was too hot and too late to taste it last night, I had a healthy piece for breakfast and it tastes absolutely delicious! I doubt if it will last more than a day here. I will definitely be making this again!  Thanks, Barb!

[Tags: , , , , ]

Banana… Er… Blueberry Bread

Four+ days of hot, humid weather did not shine kindly upon the three bananas we had in the kitchen, but I didn’t realize that until I was half done making the batter for banana bread. The peels had only the usual amount of black and spots for ‘just’ overripe bananas, but the insides were unusable – bleh. After a quickly passing state of panic where I considered hightailing it to Canada and leaving the recipe remnants for the next person passing through the kitchen (probably the dog), I, instead, thought of what else I could make this bread into. I almost decided on applesauce bread since I spotted two apples in the fridge, but then, glowing like a beacon, with heavenly trumpets sounding, I saw them…. blueberries! Yes!

Instead of the bananas, I added a little milk for the necessary moisture, then mixed in a cup and a half of blueberries, spread it in a pan with a sprinkling of sugar on top for crust, put it in the oven, and crossed my fingers. (Yes, I know it wasn’t THAT much of a stretch to switch the recipe from banana to blueberry, but allow me my drama, dangit!)

Here’s what it looked like when it came out of the oven, just a little while ago:

Looks like it has a light crusty top, so that’s a good thing. And as soon as it’s cooled and I can take it out of the pan, the taste testing will begin! And continue on until it’s been tested into oblivion.

[Tags: , , , , ]

Blueberry Muffins

I can’t believe it’s taken me so long to make Blueberry Muffins from scratch. The main reason is that the price of blueberries around here is usually way too high. However, this week they had a buy one get one free sale, so I grabbed two little packages and began dreaming of blueberry pancakes, waffles or just rolling around in them on the floor. Fortunately, Kristen suggested blueberry muffins instead.

I looked at a few recipes on the web, and adapted the best one that I found. I really pushed the blueberry content of mine to the limit, but only one muffin fell apart when I removed them, so I consider that a major success.

The taste was incredible. When I worked as a cook, I often used frozen blueberries for muffins and these totally blew them away. I really liked the crumb topping too, sure it’s another bowl to wash, but well worth the effort.

Blueberry Muffins

3 cups of all-purpose flour
1 Tbsp baking powder
1/2 teaspoon baking soda
1/2 teaspoon salt
10 Tbsp unsalted butter (1 1/4 stick), softened
1 cup sugar
2 large eggs
1 1/2 cup plain sour cream
1 teaspoon lemon juice
1 1/2 cups blueberries

Make sure the oven rack is in the middle-lower position. Preheat oven to 375-F.

Whisk together the flour, baking powder, baking soda, and salt and set aside.

In a large mixing bowl, cream butter and sugar together. Beat until fluffy. Add eggs one at a time and beat until mixed. Beat in the lemon juice.

Stir in one half of the flour mixture until just mixed. Beat in one third of the sour cream. Mix in the other half of the flour mixture. Mix in a second third of the sour cream. Beat in the remaining dry ingredients and then the remaining sour cream. Do not overbeat, just mix until blended. Fold in the berries. (If you are using frozen berries, defrost them first, drain the excess liquid, and then coat them in a light dusting of flour.)

Use a standard 12-muffin muffin pan. Coat each muffin cup lightly with olive oil using a pastry brush, with a little butter, vegetable spray or use paper liners. Fill each cup equally with the muffin dough. Bake until muffins are golden brown, about 25 to 30 minutes. Test with a long toothpick to make sure the center of the muffins are done.

Set on wire rack to cool for 5 minutes. Remove muffins from the tin and serve slightly warm.

Baking Day, Apparently

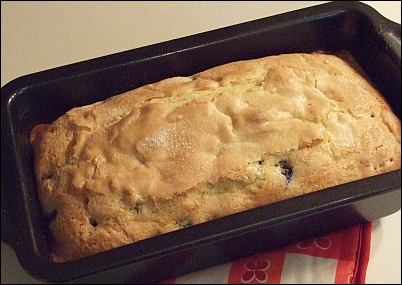
Yesterday was baking day here, apparently. I had a hankering for some sugar cookies, but then remembered the Jello Cookies recipe which is very similar, just with the jello sugar instead. So I made the dough and whipped out my cookie press only to remember, after stuffing the barrel full of dough, that the plunger was broken and I needed a NEW press. Leaving me wondering why I had put the thing back in the cupboard to begin with. Oh well! So I got out a biscuit cutter and made cutouts. Since I used orange jello sugar, we had round orange cookies, with some green decorative sugars sprinkled on top for fall. I’m pretending that they’re pumpkins.

I also made a loaf of yeast bread with half white flour and half whole wheat; it turned out pretty good, if a bit dense! Tastes really good spread with butter and then strawberry jam.

Sorry I don’t have any photos at the moment – everything’s all sort of tucked away under plastic and foil and such and SO FAR AWAY in the kitchen, where I am not. Maybe I’ll get a few shots later if I can before everything’s gone. 🙂
[Tags: , , , , ]

Egg Braid Bread

Egg Braid Bread

I found a recipe for Egg Braid Bread on the side of a bag of Safeway brand flour. It looked interesting, so I thought I’d give it a try. The recipe called for water, milk and eggs to be mixed with the yeast, and then adding the flour.

It came together well, and I kneaded it the full ten minutes as reccomended. The most difficult part was getting braiding lessons from Kristen, even after she demonstrated by braiding her hair, I still needed her guidance with the bread.

When the bread was warm it was good, but not great, which is why I’m not yet sharing the recipe. I liked the taste and consistency, it had a nice spring to it which I really enjoyed.

The next day the bread seemed rather dry as if the moisture had escaped during the night. Our friend Tom who gave us that delicious loaf of bread from a few weeks ago, sprays his dough with water before putting it in the oven. I’m going to try this method next time since all our breads always seem a little floury on the outside.

A Gift of Bread

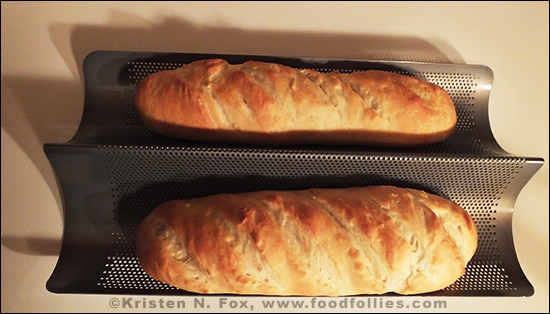
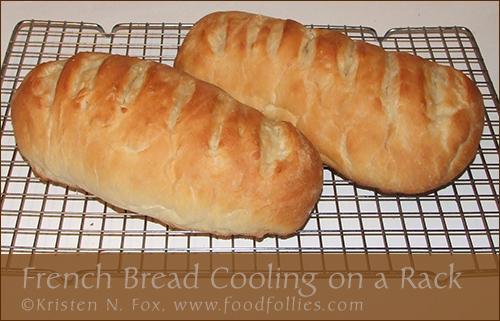
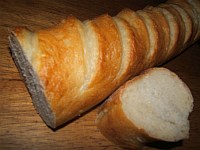
Yesterday one of our bestest friends gifted us with a loaf of his homemade bread – we barely made it home with the thing intact – it was perfect! It had a thick, shiny, golden brown crust that gave your teeth a workout when chewing, a delicious flavor, the inside was thick and tasty, but tender as well. It even had the fancy schmancy diagonal slots across the top! I speak in past tense, although we do have a bit of it left, but it’s not going to last very much longer!

Top O’ the Muffin to Ya!

On cold mornings I love to whip up a box of Jiffy Muffin Mix. I tried the Apple Cinnamon for the first time the other day, very apple-y but kind of light on the cinnamon. Next time I’m definitely adding some cinnamon myself.

BTW if you have extra sour cream around, substitute it for the milk, it gives them a nice boost.