Air Fryer Mini Blueberry Muffin Experiment

Mini blueberry muffins from the air fryer

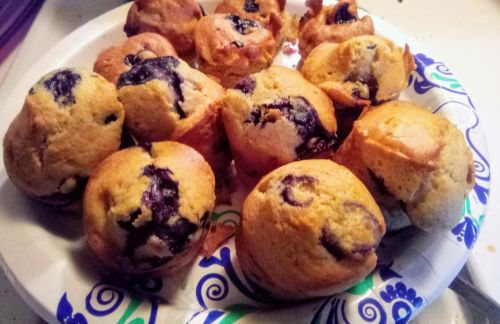
Kristen bought me an air fryer accessory set for Christmas, so I decided to try the silicone mini-muffin pan this morning and make blueberry muffins. The results were… less than perfect. The problem with my air fryer is that it has no window, so in order to see if something’s done I have to pull them out of the fryer and interrupt the cooking process. In this case, I had looked at internet recipes for the timing and temp, but stuck to the traditional blueberry muffin recipe that we’ve always used at home. This is because foods usually cook a lot faster, and at lower temps in the air fryer as opposed to a regular oven. What I didn’t realize is that the actual recipes for air fryer muffins are completely different, so my traditional recipe was not the best choice.

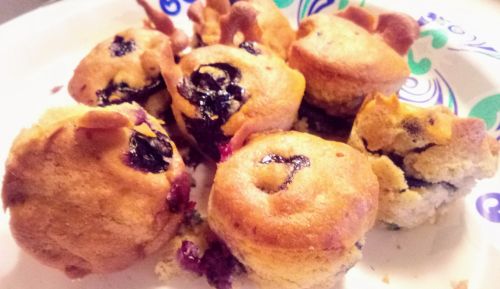
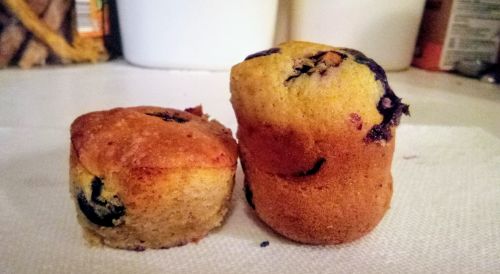
You can probably tell from the hodge-podge above that the results were far from perfect. The most obvious thing is that they hadn’t risen. Recipes on the internet had said to bake the muffins at 340 degrees for about 15 minutes. When I looked at mine, the tops were nicely browned, so I gave them the toothpick test, for some reason the toothpick came out clean. As I tried to get them out of the silicone tray, two of them broke, and I could see raw batter inside. I put the pieces back together and put the entire batch back into the air fryer. It took another 15 minutes worth of cooking in order to get them fully baked, and of course they never rose properly.

For the second batch, I decided to go with the regular oven so that I could monitor how they were doing. I continued to use the silicone mini muffin pan, but followed the regular oven directions of 375 degrees, for 25 minutes. The muffins rose properly, although the curved bottom of the mini muffin pan makes them look a little different. Below I have a comparison of the two batches and their size difference.

The muffin on the left is from the air fryer batch, which were taken out way to early and interrupted the rising process. The muffin on the right was from the regular oven batch, you can see how much higher it rose. The second batch was much more fluffy, although both batches taste fine. In the future I’m going to stick to doing muffins in the regular oven, although I do like the smaller size, so I’m going to get larger mini muffin pans.
The muffins in the front are from the regular oven, the smaller ones hiding in the back are from the air fryer.

Homemade Pancakes

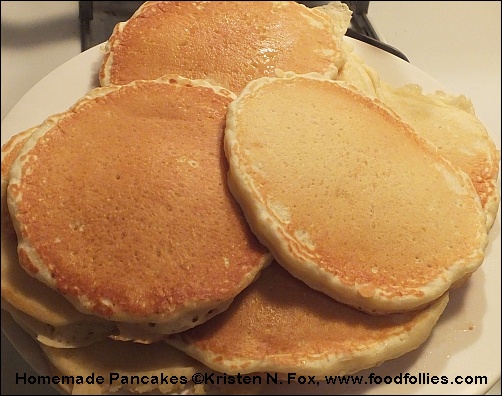
Sometimes you’re inspired to try something new, and sometimes you’ve just run out of the instant stuff. This is definitely the latter case.  We had looked up a recipe from allrecipes.com a while ago, and decided to give it a try.

There are two main differences between the homemade and commercial versions (not counting the various “enriched flour” ingredients). The first is the use of butter instead of hydrogenated cottonseed or soybean oil, and the second was that the homemade recipe used only one egg instead of two.

The pancakes themselves came out lighter and softer than their commercial counterparts. The taste was good, but it felt a little like something was missing. We’re thinking of trying a second egg in mix next time to see how that tastes.

Overall it was a fairly easy process, and I liked removing the hydrogenated oils from the mix.

Now, after many iterations and recipe tweaks from ourselves and others, we’ve posted the recipe we use, below.

Homemade Pancakes

Homemade Pancake Recipe

  • 1 1/2 cups milk
  • 4 tablespoons white vinegar
  • 2 cups flour
  • 4 tablespoons white sugar
  • 2 teaspoons baking powder
  • 1 teaspoon baking soda
  • 1 teaspoon salt
  • 2 eggs
  • 4 tablespoons melted butter

1. Combine milk with vinegar in a medium bowl and set aside for 5 minutes to “sour”. (If you have buttermilk, you can use that instead of the regular milk and vinegar.)

2. Combine dry ingredients in a large mixing bowl.

3. Whisk egg and melted butter into “soured” milk.

4. Pour flour mixture into wet ingredients and whisk until lumps are gone.

5. Heat nonstick large skillet or griddle over medium heat and coat with cooking spray or light oil/butter. Pour 1/4 cupfuls of batter onto griddle. Cook until many bubbles appear on the surface of the pancakes. Flip with a spatula and cook until browned on the other side.

Makes about 20 good sized pancakes.

Review: Murphy’s Bistro and Tavern

Murphys-Chicken-pot-pie-300x225Kristen and I, and my sister, brother in law and niece all went to Murphy’s Bistro and Tavern in High Falls, NY, the restaurant which replaced the Northern Spy Cafe.

The staff was friendly and the food was amazing! I ordered the Chicken Pot Pie which was delicious. The crust on top was light and flaky, the chicken was tender and the gravy was to die for! Kristen had the burger which came with potato wedges. I sampled both, the wedges were awesome and the burger melts in your mouth. My brother in law had the Shepherd’s Pie which he said was the best he ever had.

For dessert, I had the Bailey’s Cheesecake, Kristen had the Chocolate Mousse, and my sister had the Flourless Chocolate Torte. I sampled all of them, and each one was amazing. The mousse and the torte were both deliciously chocolatey and the cheesecake was rich and creamy.

I will definitely be going back, the hard part is going to be choosing between the Shepherd’s pie, the Pot Pie of the Day, the Philly Cheese Steak Panini or…. Obviously I’ll be going back a lot.

Blueberry Crepes

I decided to make some Blueberry Crepes for our 16th anniversary breakfast. Looking around the web I found a lot of variations but I decided to go with the way I remembered having them as a kid. (Does anyone remember a restaurant called the Crepe and the Pancake?) These were not the rolled kind that caused so many injuries in an episode of Seinfeld, but more gently folded like an omelet.

First step was the whipped cream. I don’t mean the store bought stuff; it only takes a few minutes to throw together the real thing and it’s so worth it! Once made, I put the whipped cream in the fridge and began working on the crepes.

For the filling, I combined blueberries, orange juice, cinnamon, vanilla and salt in a sauce pan and put them on a low heat. I heated them until the blueberries started to soften and release their juices. I set the mixture aside and made the batter next.

The batter is very similar to pancake batter but a lot thinner. I thought it was too thin at first, but decided to trust the recipe and go for it. Flipping them was tricky, I used two spatulas to get the majority of the crepe off of the pan before flipping.

Once they were done I moved the crepes to a plate one by one, spooned in the filling to one side and folded them over. The filling was still warm enough to serve, so there was no need to heat anything. Top them with a dollop of whipped cream, then eat!

The result was delicious! The blueberries were a little tangy which worked really well with the sweetness of the mixture and the whipped cream. The crepes had a soft, almost elastic texture to them which held the filling together but broke easily with a fork. I’ll definitely be making these again in the future.

Blueberry Crepes

Whipped Cream

1 cup of heavy cream
1 tbsp. confectioners sugar
1/4 tsp. vanilla

Put ingredients in a medium to large bowl and mix with an electric mixer or a food processor. It will take a couple of minutes but watch it carefully. Stop mixing once peaks start to form or you may end up with butter. Store whipped cream in refrigerator until ready to garnish crepes.

Blueberry Filling

1 pint blueberries
1/2 orange juice
1/4 tsp. cinnamon
1/4 cup sugar
1 pinch of salt
1 pinch of corn starch
1/8 tsp. of vanilla

Mix blueberries, orange juice, sugar, salt, and vanilla together in a medium saucepan. Heat over low heat until the blueberries start to soften, stirring occasionally. Sprinkle a small amount of corn starch into the mixture and stir. Remove from heat but continue to stir occasionally. If the sauce looks too thin you can add more corn starch and reheat for a few minutes. Be careful not to over starch it though. It’s better for the mixture to be a little runny than it is to taste corn starchy.

Once done, it will probably stay warm enough to spoon right into the crepes, but if not, just reheat over low heat for a few minutes.

Crepes

1/2 cup flour
2 eggs, lightly beaten
3/4 cup milk
1 tbsp. Sugar
1 pinch salt

Preheat griddle or pan and add butter or nonstick cooking spray. Once warm, keep it on a low to medium heat.

In a large bowl, combine the dry ingredients first, whisk together thoroughly. Break the eggs in a separate bowl and beat just enough to break the yolks. Add the eggs and milk to the dry mixture and whisk until batter is smooth. It will look very thin, but that’s normal. Use a ladle or pitcher to pour the batter onto the griddle in approximately 9-inch circles, although you can make them bigger or smaller as you wish. Watch for the sides of the crepe to look firm and then gently flip with a spatula. Once both sides are done, place on a plate, scoop the prepared blueberry filling to one side of the crepe circle, then fold the crepe over and garnish with whipped cream.
Heartbreaking Dawns Hot Sauce

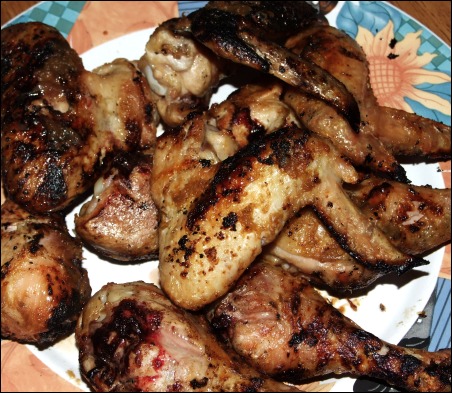
Recently, we acquired some excellent products from the good people at Heartbreaking Dawns, including a hot jam/chutney, hot sauce, and hot rub. I decided to try some of the Jalapeno Pineapple Hot Sauce on a batch of chicken wings and legs, and was not disappointed. I barbecued the chicken on the outdoor grill – I coated it with a little oil and garlic powder at first and cooked about 3/4 done before brushing on the hot sauce.I used a very light touch with the sauce since it’s pretty potent, and I’m definitely not the bravest hot sauce eater out there.

The Jalapeno Pineapple sauce has a distinctive sweet, citric flavor which greets the tongue first. It’s immediately followed by the kick (that’s an understatement) of jalapeno and habanero peppers. The overall flavor was delicious, enhancing the chicken without overpowering it, with a spice that’ll leave your tongue and lips tingling with heat.
I’ve already been thinking of recipes I can add this sauce to. I have a teriyaki sauce variation which it should compliment nicely. I think it would also go really well with kielbasa.

One final note, the ingredients in the sauce are all quality, with nothing you can’t pronounce. And there are no artificial preservatives, MSG, HFCS, or any other evil initials you can think of.

If you love hot sauce, this will be a variety you’ll like to try – something a little different. Their website is Heartbreaking Dawns – check out their entire product assortment – gift packages also look to be available right now as well.

[Tags: , , , , ]

Blueberry Pie

When I saw the 2.5 lb container of fresh blueberries for 5.99 I looked at it sort of lovingly and thought, “I could make a blueberry pie.” I’ve never actually made a homemade pie. Kristen usually is in charge of pies, while I’m normally in charge of grilling and making omelettes. When I worked as a cook, our pies were made with canned fillings, so there was no help there.

I did go the easy route and went with the pre-made pie crust. I’ve actually made my own pie crust before, for Shepherd’s Pie, but since I was starting this pie in the evening, I wanted to move things along.

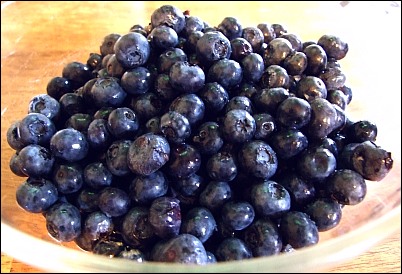
Billions and Billions of Blueberries

It took all of thirty seconds for us to find some basic blueberry pie recipes on the web and tweak our own variation. Putting the ingredients together was a snap, and we have enough blueberries leftover for sprinkling on breakfast cereals, mixing in yogurts and possibly sharing with the local wildlife.

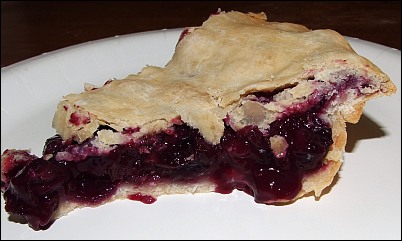
Kristen guided me through the proper method of sealing the two pie crust halves. When I made my Shepherd’s Pie, the edge was a bit on the crusty side. The baking took longer than we expected, about an extra half hour, but the results were delicious. This is the first homemade blueberry pie I’ve ever had and it beat every store or restaurant pie I’ve had hands down.

Mmmm pie

Hopefully, we can catch the other berry families on sale and live on pie for the rest of the summer. Oh, and here’s the recipe we used:

Blueberry Pie Recipe

Filling ingredients:
6 cups of blueberries, cleaned and stems removed
2 Tbsp lemon juice, freshly squeezed if possible
1/4 cup all-purpose flour
1/2 cup sugar
1/4 teaspoon ground cinnamon
1/4 tsp salt
2 Tbsp butter, cut into small pieces

Prepare crust. If you have already made dough, on a lightly floured work surface, roll out half of the dough to 1/8-inch-thick circle, about 13 inches in diameter. Drape dough over a 9-inch pie pan and put into the refrigerator to chill for about 30 minutes. If you have purchased pre-rolled circles, allow them to defrost (if frozen) and place one of the circles in the pie pan.

Put blueberries in a large blow. Sprinkle flour over the blueberries and stir until the blueberries are all coated with the flour. Then, add the cinnamon, sugar, salt, and lemon juice, to the blueberries and mix until blended. Place in the chilled bottom crust of the pie pan. Dot the top with butter pieces. Roll out the remaining dough to the same size and thickness. Place the other piece of dough on top, trim to 1/2 inch over the edge of the pan, and crimp the edges with a fork or your fingers. Put the pie in the refrigerator to chill until firm, about 30 minutes. Pre-heat oven to 425°F in the meantime.

Remove from refrigerator. Score the pie on the top with 4 cuts (so steam can escape while cooking) – add a baking ring or put foil around edges of pie to protect edges. Bake for 20 minutes at 425°. Remove pie ring/foil. Reduce heat to 350°F and bake for 30 to 40 minutes more or until juices are bubbling. Let cool before serving.

Makes 8 servings.

Celebrating the Twinkee

It’s the 75th anniversary of the Twinkee and to celebrate their putting together a Twinkee Cookbook, including such creations as the Twinkee Taco. The article also contains a reproduction of the infamous “Twinkee Experiment.”

Birth of a Monster

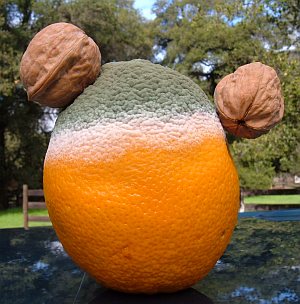
Ah, the dark side of creativity. This morning I reached into a bowl where we had placed some oranges and walnuts, and this was the result:

Kristen and I couldn’t stop laughing at this poor abomination. It looked like some sort of deranged mousketeer. After dubbing it: Mr. Fuzzy Nuts I briefly considered giving him his own T-shirt and possible cartoon series. Alas, he lost an ear whilst trying to perch precariously on a fence post, so this will be his one and only appearance.

The Chicken and the Egg

I’ve been slaving over a first post for a few days,
when I realized what I was lacking was a bit of
introduction.

I began cooking when I was twelve years old. I can remember my Mom
calling from work and asking me to put some chicken in the oven (she
had already prepared it) after school one day. It was the first time
I had ever used the oven, and I was scared to death that I would
burn down the house.

When the chicken came out golden and crispy later, I was hooked. The
next thing I remember learning was scrambled eggs. I learned very
quickly that one of the secrets to great scrambled eggs was to keep
them moving in the pan so that they didn’t just sit in the pan and
cook flat. After that, I quickly became the week day cook at home,
and continued cooking regularly when I moved out on my own.

I started cooking professionally about six years ago. The transition
from “cook at home” to “professional cook” is not an easy one.
Suddenly, you have to plan out a lot of food on a very strict time
table. It’s like planning out a major party on a daily basis.

Many of the techniques I had learned at home were still applicable
though, and I learned even more from a great lady named Georgette
who trained me in those first chaotic weeks. Most of these
techniques are so simple, they usually go unmentioned (like never
flip a burger more than once) yet I know many people who cook
regularly and have never learned them. I’m going to share as many of
these as I can, as we go along here, so those of you who are
experienced cooks/chefs may have to bear with me at times.

I’ll also be sharing my more original recipes, but only after I feel
that they’ve been perfected enough in writing to reproduce them
accurately.