 It’s girl-scout cookie season soon (if not already?), and I ran across this interesting tidbit. It points out that the girl scout cookies still use hydrogenated oils, so they suggest making a donation to the girl scouts instead of buying cookies and making the cookies yourself! And here is the page with links to the homemade girl-scout cookie recipes. It’s verrrrry tempting, isn’t it!
[Tags: girl scout cookies, recipes, homemade, cookies]
Author: Kristen
Happy Birthday, John!
 Happy Birthday, John and Happy Solstice too! John requested a chocolate cake for his birthday this year (surprise!), so I thought I’d check out some new recipes online. I decided to try a Black Chocolate Cake Recipe since we’re both fans of dark chocolate. The only change I made in that linked recipe was to use butter instead of shortening. The cake layers came out great – quite dense and didn’t get all puffy/risen in the middle, so no leveling was needed.
For the frosting I used Caroline’s Chocolate Fudge Frosting Recipe, although as many commenters suggested on that site, I used less milk than indicated.
And here it is!
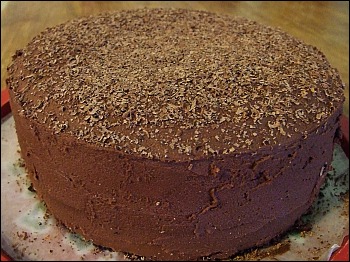
I also shaved some dark chocolate over the top of it to add even more chocolateness, which I’m sure it needed. (Don’t look at the plate around the bottom of the cake as I hadn’t tidied up yet when I took the photo. I said DON’T look!)
Maybe next time I try this recipe I’ll make a double batch of frosting and do some actual decorating around the edges and such.
[Tags: food, baking, birthday cake, chocolate cake, recipes]
Cherry Cookies
It’s holiday time, so I’m starting to pull out recipes I usually only make this time of year. (For no other reason except that it’s nice to have some recipes for special occasions.) I started with Cherry Cookies, since I haven’t made those in a LONG time, and they look so darn festive – covered in chopped walnuts with a cherry in the center!

See? Festive!
Cherry Cookies
2 cups flour
1 tsp. baking powder
1/4 tsp. salt
1 cup butter or margarine (softened)
3/4 cup sugar
2 egg yolks, beaten
1 tsp. vanilla
2 cups finely chopped walnuts or pecans
2 unbeaten egg whites
cherry halves
In small bowl combine flour, baking powder, and salt.
In large mixer bowl beat margarine and sugar until light and fluffy. Add egg yolks, dry ingredients and vanilla. Mix well. Chill dough 30 minutes. Preheat oven to 375 degrees.
Grease 2 large cookie sheets. Place chopped nuts in one small bowl and egg whites in another. Roll dough by the teaspoonful into balls, flatten slightly, dip in egg whites, then roll in nuts. Place on cookie sheets. Press cherry half into center of each cookie. Bake 12 minutes. Cool on wire racks. Makes about 54.
Jam & Cheese Loaf Recipe
 For some reason I had a little extra time on the day before Thanksgiving, so I decided to make a Jam & Cheese Loaf for breakfast the next day. It’s essentially a biscuit base, cream cheese filling, topped with the jam of your choice. Really easy and really tasty, and it looks pretty neat too, since you braid the dough over the filling:
I basically halfed this recipe since the full recipe makes a pretty large loaf. We finished it off in no time.
Jam and Cheese Loaf
1 package hyperactive, dry yeast
1/2 cup warm water (110-115 degrees)
2 1/2 cups packaged biscuit mix
1 beaten egg
1 tablespoon sugar
1 8-ounce package cream cheese, softened
1/2 cup sugar
1 tablespoon lemon juice
1/4 cup desired jam or preserves
In a mixing bowl, dissolve yeast in water. Stir in biscuit mix, egg, and one tablespoon sugar. Turn out onto surface dusted with additional biscuit mix. Knead gently 20 strokes. Place dough on a greased 15 1/2 x 12 inch baking sheet. Pat into a 14 x 9 inch rectangle.
For filling, stir together cream cheese, the 1/2 cup sugar, and lemon juice until smooth. Spread lengthwise down center third of rectangle. Make 3 inch cuts in dough at 1 inch intervals on both sides of filling. Fold strips alternately over filling. Cover. Chill Overnight. Bake in a 350 degree oven for 20 minutes. Spoon desired jam down center of loaf. Bake 5 minutes more or until golden brown. Cool 10 minutes. Makes 1 loaf.
Homemade Hot Cocoa Mix

 I picked up the complimentary ‘Something Extra’ magazine from our local Nob Hill Foods supermarket the other day. While I was wandering through the pages, my attention caught on the recipe for homemade hot chocolate mix. I was excited because over the last year we’d been looking at the ingredients in all the standard single serving packets of hot chocolate on the market, and it seems that (excluding the more expensive or gourmet brands) there was a lot of unnecessary ingredients in them, including sucralose, which tends to give us both slight headaches. The one with the fewest ingredients was Swiss Miss (sans marshmallows), so we’d been using that.
Anyway, the recipe was pretty good, but we felt it needed a touch more sugar, so here’s our tweaked version of their recipe:
Homemade Hot Cocoa Mix
3 cups instant dry milk
1 1/2 to 2 cups sugar (to taste)
1 cup unsweetened cocoa powder
1 tbsp. cornstarch
1 tbsp. cinnamon (optional)
Just mix all of the ingredients together in a sealable plastic ziplock bag and store it in a container with a tight fitting lid. To make a cup of hot chocolate, add 1/3 cup of the mixture to a mug with 8 oz. steaming hot water and stir well. (Makes about 15 mugs.)
We’re very happy with the way it came out!
Spanish Sausages and Nun Cookies
 Some other exotic foods our previously mentioned globetrotting friend bestowed upon us involved specialties from Spain, including Spanish sausages, and breadsticks:
And these delicate square cookies made by nuns:
The sausage had a fantastic flavor and texture, the bread sticks were excellently crunchy, and the ‘nun cookies’ finished things off with a sort of fig-newtony type flair, but with a fruit that was lighter in color and taste. We ate them all like a snack, and washed them down with a bottle of fruity white wine, which complimented things well. All around it was a night of fantastic food tastery!
[Tags: food, Spain, sausage, cookies]
Sweet Potato Bisque with Tortellini
 As some of the regular readers might have realized, we’ve become enamored of the selection of soups and soup-bases at Trader Joe’s. So on our last store trip (an hour each way, but still worth it) we picked up a container of their sweet potato bisque.
I emptied it into our small crock pot, thinned it with water a bit (it was still quite thick), added a few spices, and let it cook while I started making the homemade tortellini. I just wanted to make the noodles, no filling. (Sorry no ‘in progress’ photos – I was covered in flour and very focused – LOL!). I let the soup ‘crock’ for a number of hours. About two hours before we were going to eat, I tossed in the small tortellinis – it took them a while to cook, but they did fine. When we served it, we added a dollup (I’ve always wanted to use the word dollup) of sour cream in the middle, and a sprinkling of nutmeg.
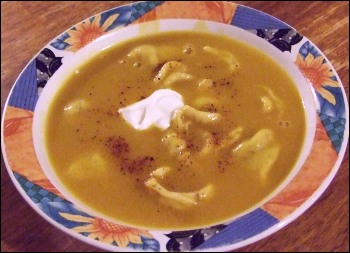
It came out very tasty! And although the bisque has a lovely flavor, it IS rather mild – the sour cream sort of finished it out with a nice tang.
[Tags: food, soup, bisque, cooking, sweet potato]
Mini Apple Pies
 A long time ago we’d found these terrific little individual serving glass pyrex dishes at the Dollar Store of all places, and the other day I got to use them for the first time when making a couple of mini apple pies! (I would have made a regular pie, but we only had three apples in the fridge – besides – what a good ready-made excuse to use the darn things.)
I cut our apple pie recipe (below) in half, and also cut our pie crust recipe (below) in half. I also have to admit that this is the first time I’ve actually made a pie crust from scratch! John’s made them from scratch, but I’ve grabbed the pre-made crusts in the past. But after doing this and seeing how easy it is, I’ll probably hardly EVER use the pre-made crusts again.
The final pies came out really cute, and just like a regular apple pie, although the ‘individual’ portions were pretty big, but we got over it.
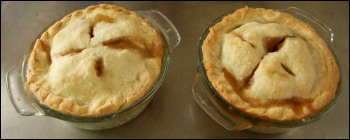
One more point: as you can see in the photo, I sealed the edges of the pie like normal, but tucked the edges back in the glass pan a bit since I didn’t want them to get dried out or burned. Wallah!
Here are the recipes I adapted…
Apple Pie
6 cups thinly sliced apples (Granny Smith, MacIntosh do well)
3/4 cup sugar
2 tablespoons flour
3/4 teaspoon cinnamon
1/4 teaspoon salt
1/8 teaspoon nutmeg
1 tablespoon lemon juice
1 package Pillsbury pie crusts (2 crusts)
or use a homemade double crust recipe
Bring crust to room temperature. Unfold crust and press out fold lines with fingers. If crust cracks, wet fingers and push edges of crack together to seal. Place crust in ungreased 9-inch pan, glass recommended. Press crust firmly against sides and bottom. Trim crust along pan edge. (Or follow homemade crust recipe)
Heat oven to 425 degrees. In large bowl, combine all filling ingredients; mix lightly. Fill pie crust. Place second crust over filling. Wrap excess top crust under bottom crust edge. Press edges together to seal – flute. Cut slits in top crust.
Bake at 425 degrees for 40-45 minutes or until apples are tender and crust is golden brown.
Note: Slice the apple pieces really thin to make sure they can be cooked through completely during baking. Also, when cutting up the apples, don’t get TOO close to the core. You want to cut off any section that has any core ‘string’ type stuff on it because that won’t get soft while cooking and can be annoying to bite into. Also, if you use Granny Smith apples you get more tartness than MacIntosh, FYI.
Pie Crust
1 cup Crisco (or butter)
2 and 1/4 cups flour
1 teaspoon salt
3/4 cup ice water.
Mix Crisco, flour and salt with a fork until crumbly.
Add 1/2 cup of water to flour mixture and mix with a fork.
Add remaining water until mixture is moistened – you
probably won’t have to add ALL of the leftover water.
Roll out 1/2 of the dough on a board covered with flour.
Use enough flour to make it roll easily.
This makes top and bottom for a 9-inch pie.
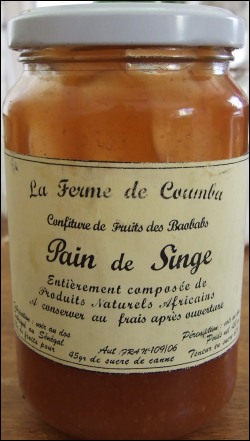
Baobab Fruit Spread
A globetrotting friend of ours recently presented us with a jar of genuine baobab jam (I think it’s jam – or fruit spread – either way) from Africa (Senegal, to be specific)! It’s got a luscious taste – almost like a marmelade or honey, and we just dove into it and started eating it on crackers:
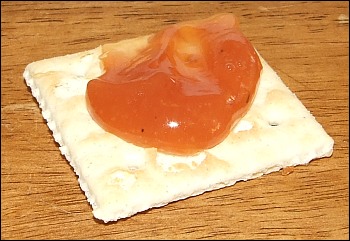
We ate half the jar in one sitting – I wonder if it’s addictive? Just kidding! I don’t think this is something you can readily get in the United States, if at all, so we were excited to be able to try something that seems to exotic.
Our friend also gave us some other exotic goodies, but you’ll have to wait for another post for those.
[Tags: baobab fruit, Africa, jam, food, photos]
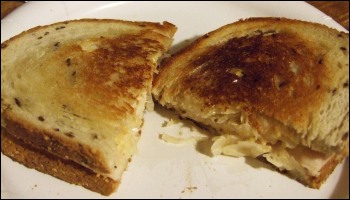
Grilled Turkey Reuben
 Every so often I remember that I love Grilled Turkey Reubens and that I haven’t had one in a LONG time!
They’re really easy to make – sliced deli turkey, lots of good saurkraut (we used Hebrew National), and a Thousand Islands dressing on your choice of rye bread – we chose a Jewish Rye. (In our area of California, the only kind of ryes available are pre-packaged, made by Orowheat, but they work just fine! Marble Rye is also good, or even a Pumpernickel, although the taste is stronger.)
So assemble the sandwich as you like, butter the outsides of the bread, and then grill until golden brown!
That’s not the most exciting picture, and you can see that it’s browned a bit unevenly, but I was in more of a hurry to EAT the sandwich than to spend time on a pretty presentation – hah! It tasted even better than it looks here, if that helps.
Grilled Turkey Reubens
1 loaf marble rye bread
sliced deli turkey
1 can/jar saurkraut
Thousand Island dressing
Swiss or Monterey jack cheese
butter/margarine
Take a piece of bread, layer turkey, some saurkraut, slices of cheese, and top with dressing. Complete with another slice of bread. Spread butter on outside of each bread slice and grill sandwich in a (nonstick recommended) frying pan on low heat until bread is golden brown and crispy and cheese is melted. Cut in half and serve.