Homemade Pancakes

Sometimes you’re inspired to try something new, and sometimes you’ve just run out of the instant stuff. This is definitely the latter case.  We had looked up a recipe from allrecipes.com a while ago, and decided to give it a try.

There are two main differences between the homemade and commercial versions (not counting the various “enriched flour” ingredients). The first is the use of butter instead of hydrogenated cottonseed or soybean oil, and the second was that the homemade recipe used only one egg instead of two.

The pancakes themselves came out lighter and softer than their commercial counterparts. The taste was good, but it felt a little like something was missing. We’re thinking of trying a second egg in mix next time to see how that tastes.

Overall it was a fairly easy process, and I liked removing the hydrogenated oils from the mix.

Now, after many iterations and recipe tweaks from ourselves and others, we’ve posted the recipe we use, below.

Homemade Pancakes

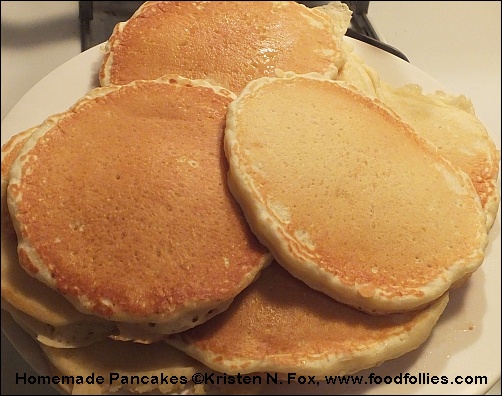
Homemade Pancake Recipe

  • 1 1/2 cups milk
  • 4 tablespoons white vinegar
  • 2 cups flour
  • 4 tablespoons white sugar
  • 2 teaspoons baking powder
  • 1 teaspoon baking soda
  • 1 teaspoon salt
  • 2 eggs
  • 4 tablespoons melted butter

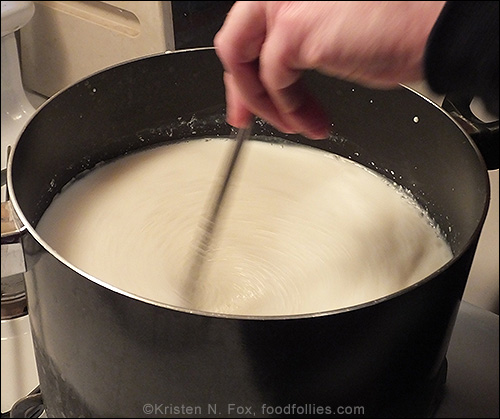
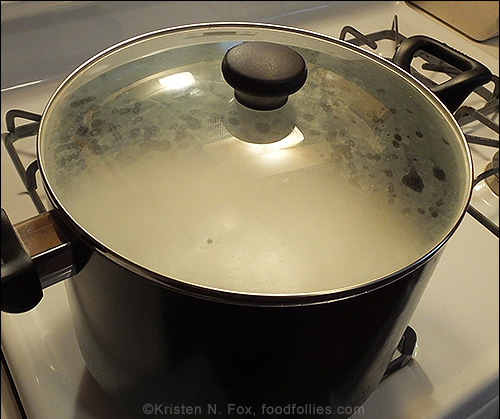
1. Combine milk with vinegar in a medium bowl and set aside for 5 minutes to “sour”. (If you have buttermilk, you can use that instead of the regular milk and vinegar.)

2. Combine dry ingredients in a large mixing bowl.

3. Whisk egg and melted butter into “soured” milk.

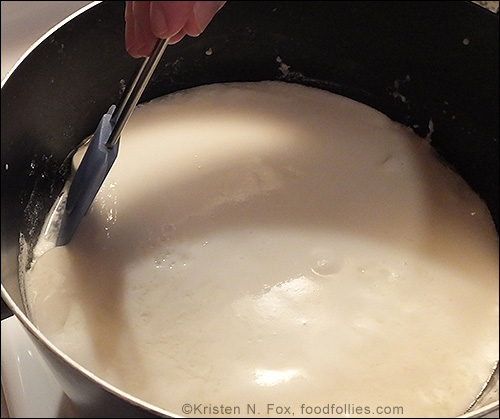
4. Pour flour mixture into wet ingredients and whisk until lumps are gone.

5. Heat nonstick large skillet or griddle over medium heat and coat with cooking spray or light oil/butter. Pour 1/4 cupfuls of batter onto griddle. Cook until many bubbles appear on the surface of the pancakes. Flip with a spatula and cook until browned on the other side.

Makes about 20 good sized pancakes.

Homemade Mozzarella Cheese

John got me a cheesemaking kit for Christmas, and we finally decided that the time was right to make us some CHEEEEESE! Fresh Mozzarella to be exact. All we had to get was a gallon of (non-ULTRApasteurized) whole milk – the rest of the ingredients were in the kit – rennet, cheese salt (non-iodized), citric acid, and a thermometer.

Below are photos and general descriptions of the process – this is not detailed with exact measurements and not a full recipe by any means, so if you want to make your own cheese, follow the link above or google it – lots of great info online! Onward…..

First, we dissolved a 1/4 tablet of rennet into a little water and set that aside.  Then we dissolved teaspoons of citric acid in water and poured that in a large pot, and added the entire gallon of milk – heating it til about 90 degrees. It didn’t really take that long.

Then we removed the pot from the burner and slowly stirred in the rennet solution we made earlier for about 30 seconds. They make sure to specify stirring up and down, not just spinning it around.

Next, we took it off the warm burner and let it sit for about 5 minutes with the lid on. This is the part where the whey separates out and the curd beneath starts to get the consistency of custard.  Ours actually took a bit longer than 5 minutes – maybe an extra 5 tops.

In the image below you can see the custardy curd part is easily pulled away from the side of the pot. It was a lot softer than we were expecting (since we had ‘finished cheese’ on the brain) but it was just perfect at this point.

Next, we took a knife and cut the curd in a grid pattern – feels like you’re cutting nothing, but it’s really working – LOL.  I shook the pot slightly and could see that the cut marks were staying, not healing back up.  Whew!

Gotta heat it up again, to 105, while slowly moving the curds around – not really ‘stirring’. Then, we took it off the heat and kept stirring for a few more minutes. In the photo, you can see the yellowy, watery whey, and the chunks of curd much better now.

Then, we scooped out the chunks of whey with a slotted spoon.  After a while John suggested we use the strainer, which did save us a lot of time, although it was fun, for a while, to stir the goop and find new curds that had sunk to the bottom of the pot. Here are the curds in a glass bowl, with some whey settled around it.

At this point we used the microwave method of heating the curds, then draining off the excess whey, then adding a little salt, and massaging it into a ball-ish form, heating it again, and then stretching it like taffy, until it was smooth and shiny. (The more you stretch/work it the firmer it will be.)

After stretching, we formed it into a ball and cooled it in cold water. After five minutes, we added ice and let it set for 15 more minutes.

Then, as we could barely contain ourselves, we rescued it from the cold bath, patted it dry with paper towels, and cut off a chunk to eat – ohhhh – it was soooo good!  Creamy, a wonderful flavor and consistency. And although it seemed like there were a lot of steps, it only took us about 45 minutes to make it – not bad for cheesemaking newbies!

I highly recommend the Cheesemaking Kit from Cheesemaking.com – and they have a number of other kits and supplies and books too. The directions were easy to follow, and the cheese was delicious! 🙂

Chocolate Chocolate Chip Cookies Recipe

I scanned the internet for a good double chocolate chip cookie recipe, and found one that I tweaked a bit – they came out fabulous! Of course, it’s hard to mess up basic chocolate chip cookies, but you don’t want to take serious risks with CHOCOLATE! 😉

Chocolate Chocolate Chip Cookies - photo © Kristen N. Fox

They were gooey when they came out of the oven but after waiting for them to cool down before removing them to the cooling rack, they stiffened up nicely, and then remained chewy for as long as they lasted. I think my swapping out some of the white sugar for brown sugar helped. Also, feel free to use a little less sugar if you like – reviews of the original recipe seemed to indicate that the amount can be flexible according to taste.

Here’s the final recipe I ended up with:

Chocolate Chocolate Chip Cookies

1 cup butter
1 cup white sugar
1 cup brown sugar (not packed)
2 large eggs
2 teaspoons vanilla
2 cups flour
3/4 cup cocoa
1 teaspoon baking soda
1/2 teaspoon salt
12 oz. bag of chocolate chips

Cream together butter and the sugars. Then add in eggs and vanilla, mixing well.

Blend in cocoa, and then baking soda and salt.

Mix in flour.

Fold in chocolate chips.

From dough, make balls about the size of a rounded teaspoon, place 1.5 inches apart on ungreased cookie sheet. Slightly flatten each ball.

Bake at 350F for 8-9 minutes. Cookies will be gooey when you pull them out of the oven – let them sit in the cookie sheet for at least five minutes before using spatula to remove them to the cooling rack.

Review: Murphy’s Bistro and Tavern

Murphys-Chicken-pot-pie-300x225Kristen and I, and my sister, brother in law and niece all went to Murphy’s Bistro and Tavern in High Falls, NY, the restaurant which replaced the Northern Spy Cafe.

The staff was friendly and the food was amazing! I ordered the Chicken Pot Pie which was delicious. The crust on top was light and flaky, the chicken was tender and the gravy was to die for! Kristen had the burger which came with potato wedges. I sampled both, the wedges were awesome and the burger melts in your mouth. My brother in law had the Shepherd’s Pie which he said was the best he ever had.

For dessert, I had the Bailey’s Cheesecake, Kristen had the Chocolate Mousse, and my sister had the Flourless Chocolate Torte. I sampled all of them, and each one was amazing. The mousse and the torte were both deliciously chocolatey and the cheesecake was rich and creamy.

I will definitely be going back, the hard part is going to be choosing between the Shepherd’s pie, the Pot Pie of the Day, the Philly Cheese Steak Panini or…. Obviously I’ll be going back a lot.

Using the New Bread Pan

I finally had a chance to use the new bread pan John got me over the holidays! It’s for French/Italian type loaves, and, at least in my case, it REALLY helps them keep their shape instead of spreading out too much and going too flat during the second rising.

The pan is about a foot and a half long, so the loaves you’re seeing are a bit on the small side (as compared to, say, Italian bread you’d see in the grocery store), but that worked well for us as we ate one and put the other one in the freezer.

This pan is a Chicago Commerical II pan, and it did a GREAT job – loaves were much rounder and ‘normal’ shape and the holes let the underside get baked properly as well – I’d definitely recommend this pan!  🙂

Blueberry Crepes

I decided to make some Blueberry Crepes for our 16th anniversary breakfast. Looking around the web I found a lot of variations but I decided to go with the way I remembered having them as a kid. (Does anyone remember a restaurant called the Crepe and the Pancake?) These were not the rolled kind that caused so many injuries in an episode of Seinfeld, but more gently folded like an omelet.

First step was the whipped cream. I don’t mean the store bought stuff; it only takes a few minutes to throw together the real thing and it’s so worth it! Once made, I put the whipped cream in the fridge and began working on the crepes.

For the filling, I combined blueberries, orange juice, cinnamon, vanilla and salt in a sauce pan and put them on a low heat. I heated them until the blueberries started to soften and release their juices. I set the mixture aside and made the batter next.

The batter is very similar to pancake batter but a lot thinner. I thought it was too thin at first, but decided to trust the recipe and go for it. Flipping them was tricky, I used two spatulas to get the majority of the crepe off of the pan before flipping.

Once they were done I moved the crepes to a plate one by one, spooned in the filling to one side and folded them over. The filling was still warm enough to serve, so there was no need to heat anything. Top them with a dollop of whipped cream, then eat!

The result was delicious! The blueberries were a little tangy which worked really well with the sweetness of the mixture and the whipped cream. The crepes had a soft, almost elastic texture to them which held the filling together but broke easily with a fork. I’ll definitely be making these again in the future.

Blueberry Crepes

Whipped Cream

1 cup of heavy cream
1 tbsp. confectioners sugar
1/4 tsp. vanilla

Put ingredients in a medium to large bowl and mix with an electric mixer or a food processor. It will take a couple of minutes but watch it carefully. Stop mixing once peaks start to form or you may end up with butter. Store whipped cream in refrigerator until ready to garnish crepes.

Blueberry Filling

1 pint blueberries
1/2 orange juice
1/4 tsp. cinnamon
1/4 cup sugar
1 pinch of salt
1 pinch of corn starch
1/8 tsp. of vanilla

Mix blueberries, orange juice, sugar, salt, and vanilla together in a medium saucepan. Heat over low heat until the blueberries start to soften, stirring occasionally. Sprinkle a small amount of corn starch into the mixture and stir. Remove from heat but continue to stir occasionally. If the sauce looks too thin you can add more corn starch and reheat for a few minutes. Be careful not to over starch it though. It’s better for the mixture to be a little runny than it is to taste corn starchy.

Once done, it will probably stay warm enough to spoon right into the crepes, but if not, just reheat over low heat for a few minutes.

Crepes

1/2 cup flour
2 eggs, lightly beaten
3/4 cup milk
1 tbsp. Sugar
1 pinch salt

Preheat griddle or pan and add butter or nonstick cooking spray. Once warm, keep it on a low to medium heat.

In a large bowl, combine the dry ingredients first, whisk together thoroughly. Break the eggs in a separate bowl and beat just enough to break the yolks. Add the eggs and milk to the dry mixture and whisk until batter is smooth. It will look very thin, but that’s normal. Use a ladle or pitcher to pour the batter onto the griddle in approximately 9-inch circles, although you can make them bigger or smaller as you wish. Watch for the sides of the crepe to look firm and then gently flip with a spatula. Once both sides are done, place on a plate, scoop the prepared blueberry filling to one side of the crepe circle, then fold the crepe over and garnish with whipped cream.

GuS – Grown-up Soda – Extra Dry Ginger Ale

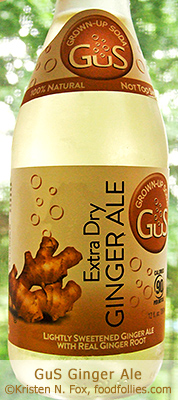
For a number of years now, John and I have been buying only soda with sugar, and not high-fructose corn syrup. We might each have, at most, one or two a week, but we often end up splitting one, sometimes doing a half and half with a can of seltzer. We like to think it’s because our tastes have, *ahem*, “matured” over the years, but even a whole soda is sometimes too much sugar when you just want a bit of fizzy sweetness.

[Note: I did just find Sierra Mist in the store in little 7 oz. cans, which is also made with sugar instead of HFCS, so it looks like we’re not the only ones thinking this way!]

Another habit we’d picked up in restaurants is making/requesting a glass of seltzer with just a wee bit of a lemon-line soda to sweeten it up a little.

If you’re a die-hard, regular 2-liter soda, full everything, drinking fan, you’re probably shuddering as you read this. LOOK AWAY NOW!!!!

Recently I ran across GUS – Grown Up Soda – a not-inexpensive 4-pack in the grocery store specialty drink section. It’s a 12 oz. bottle of soda, and it’s made with about half the sugar (not HFCS) of a regular 12 oz. soda, and is flavored with real ingredients! The ginger ale is made with real ginger and has a hint of ginger-hotness without being overwhelming, and the cola is made with real cola nut! (Haven’t tried the pomegranite yet – that’s next.) But… seriously…. real cola nut!  The last cola we knew of that actually had cola in it was Blue Sky Cola, and we haven’t seen that in years now. Oh, and no caffeine.

GuS’s are exactly as advertised – “not too sweet”, and they have terrific refined flavor and excellent fizz. It really is a grown-up soda! We highly recommend trying these if you’re looking for the less-sweet, still tasty alternative without going the way of artificial sweeteners.

(And if you’re a fan of the tv show Psych, there’s the added bonus of always trying to think up funny replacement names for the brand. If you don’t know what I mean, go watch a few episodes – LOL. )

Homemade Ravioli

I was eyeing the container of ricotta cheese in the refrigerator the other day and had the impulse to make a batch of homemade ravioli. After creating the ravioli with the pasta machine and the ravioli form (click here for more details about the actual creation process from a previous post from a long time ago), I set them on a cookie sheet covered in wax paper, none of the ravioli touching, then put them in the freezer until frozen.

Homemade Ravioli ©Kristen N. Fox, www.foodfollies.com

With one batch of pasta I was able to make enough for a few meals – tossed into plastic bags in the freezer. Homemade raviolis do VERY well in the freezer! 🙂

Mini French Bread Loaves

I think I’m getting better at this yeast-bread thing – bodes well for 2013! (Happy New Year!)

I made two mini french bread loaves and they rose and baked perfectly! Sure, I still need to work on ‘form’ but I can’t wait to cut a slice, just for sampling purposes, of course.

Happy Birthday Cake, John!

In honor of John’s birthday, we had cake for breakfast! *grin*

yellow cake with chocolate buttercream frosting

This is a homemade yellow layer cake with chocolate buttercream frosting. It’s not the neatest decorating job, but at least now I know what a cookie gun can do well, and can’t, in terms of frosting. (Next time I will use an icing bag to manually control the flow of frosting better. Notice how I blamed the tool instead of the user – hah!) Still it tastes really good, which is the most important part!

Below is the recipe for both the yellow cake and the chocolate buttercream frosting, although I switched out some fo the all-purpose flour for some cake flour to give it a slightly finer texture.

Happy Birthday, John!

Yellow Cake with Chocolate Buttercream Frosting

Yellow Cake Recipe

2 1/4 cups flour
1 1/2 cups sugar
3 1/2 teaspoons baking powder
1 teaspoon salt
1 1/4 cups milk
4 tablespoons vegetable oil
1 stick softened butter
1 tablespoon vanilla
3 large eggs

Combine flour, sugar, baking powder, and salt in a large bowl. Mix in milk, oil, and softened (not melted) butter, and vanilla. Mix in three eggs and stir until well combined and as smooth as possible.

Preheat oven to 350 degrees. Oil 2 or 3 9-inch round pans for layers. Bake 20-25 minutes, 20 minutes for three pans, 25 for two, although each oven is different. If toothpick comes out clean, you’re done. Cool on baking rack before turning out of pan.

Chocolate Buttercream Recipe

(This recipe will cover a two layer cake, and MAYBE three if you stretch it. However, you can always make another ‘half’ batch of frosting so you’re not skimping.)

1/2 cup soft (not melted, but very soft) butter
2 1/4 cups powdered sugar
1/2 cups cocoa
1/4 teaspoon vanilla
1/4 cup milk

In medium bowl, sift sugar and cocoa together to get rid of any clumps. (Can also toss them into the food processor together for a few very short bursts.) Set aside.

In large bowl, mix butter and vanilla together. Add sugar and cocoa mixture. Then add milk and stir until smooth. If too thick add a teaspoon of milk at a time until desired consistency. If too runny, add a touch more powdered sugar until desired consistency.

Frost yellow cake layers when completely cooled.